Star Light, Star Bright – How to Photograph Stars

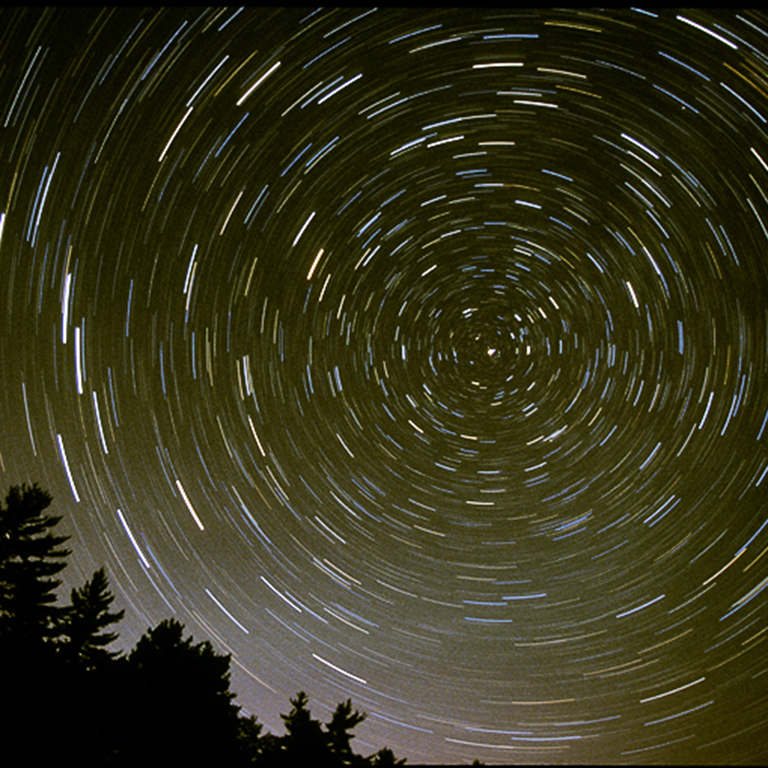
Star photography has been a long-time enigma for photographers, and it still is for cinema-photographers. We can easily see a wonderful array of millions of celestial objects on clear nights,but photographing them has been difficult as they are pinpricks of light in a black sky and they are moving, so long time exposures are necessary.

There are four ways to shoot the stars, two have been around for a long time, and two are now possible with digital photography. They are: star trails; “one shot” star images; time-lapse photography and star tracking. I will address each technique, but there are a few consonants that are applicable to all four.


1. Altitude. It is not by chance that the major observatories of the world are at high altitudes. If you are at 10,000 feet, the atmosphere is less dense. The air is not “thinner”, but having less density in the atmosphere means that you can “see through it” better. Less humidity also helps, as there are fewer water particles to shoot through. This is why the desert areas of the American Southwest are favorite places for night sky photographers – 8,000 feet above sea level, clear and dry.

2. Light Pollution. More and more locations have extraneous light that “pollutes” the dark night sky and in turn “pollutes” your images. The atmosphere near cities literally glows on the horizon. The International Dark-Sky Association is fighting to preserve the night, but with more of us on earth it is an uphill battle. In addition, the airplanes flying though your frame near a city will not help to produce a “clean” image. To find the best locations for your photo of the stars, see Jonathan Tomshine’s Dark Sky Finder.
The moon will also affect your star images. The best star photography is done on a moonless, cloudless, still night.

3. Tripod. It may seem obvious, but a sturdy tripod is necessary. Set up the shot when there is still light, then come back to your tripod hours later with a headlamp or flashlight. Make sure the tripod is in a secure place, or your gear may walk.

Now for the four methods of taking star photographs.

Star Trails

Star Trails in Maine

Star Trails. These consist of concentric circles around the North Star (Polaris). They are almost always done with wide-angle lenses that capture the maximum amount of sky.
Prepare your camera for this type of photograph by going into the camera’s menu and turning off the LCD (saves battery power) and if you are NOT going to “stack” the final photograph (more on this later) turn the “high ISO noise reduction” feature on. Locate your eyepiece shutter. In some cases there is a manual one on your camera strap. If you do not have a remote release for the shutter, set the shutter release to a 2 second delay to eliminate shake. Set the shutter speed on “Bulb”. And make sure your camera battery is fully charged.
To take an image similar to David Harp’s Maine Coast photograph, locate Polaris and place it in your frame. If you want a terrestrial object in the foreground, make sure it is far enough away from the lens so that your focus will be on “infinity” regardless of the f-stop. Sharp tree leaves (as in David’s picture) are only accomplished on a calm night. Set the ISO on 400 and the aperture wide open (i.e. f2.8). Block the eyepiece and then open the shutter and leave it open for 30 seconds or so. Review the resultant image. Some stars will obviously leave a brighter trail than others. Look for the dimmer stars, as you want many tracks in this type of photograph. Make adjustments in the ISO and try another. If it is to your liking and you want longer tracks, decrease the ISO and lengthen the exposure.
Some photographers want longer tracks but not the long exposures that produce “noise” in their pictures. They take many shorter exposures (with the noise reduction camera software turned off) and then “stack” the images in Adobe After Effects or Photoshop.

The Chess Queen and the Milky Way

The Chess Queen and the Milky Way

One Shot. Higher ISOs on today’s digital cameras (Sony’s A7 has an ISO of 409600!) allow photographers to capture the night sky with very little movement in the stars. The more sophisticated cameras combine high ISOs with noise reduction to produce “grain-free” pictures The camera preparations are the same as for photographing Star Trails.
Here is how to make an image similar to the one of the Chess Queen and the Milky Way. It is almost imperative that the one shot star picture has a foreground subject. You can find one in the daylight, but the very best of this kind of image has the Milky Way in it, as this part of the night sky is very arresting in a “one shot”. The Milky Way is a look at the edge of our galaxy, where many, many stars are “stacked”. You need to see it to position it in the frame. Lighting terrestrial objects can be a challenge, especially if they are a distance from the camera. Also, very little light is needed to expose these objects, as your ISO and exposure will be set for the stars. For the Chess Queen, a flashlight with 3 layers of tissue over the light was used, and the formation was “painted” for only a part of the entire exposure.
Set your camera to 3200 or 6400 ISO with the aperture on your camera wide open. Take a 20 second time exposure painting the foreground. Sophisticated cameras will spend another 10 seconds or so to process out the noise. Check out the resultant picture. Too much light on the foreground object? Not enough stars? Adjust the length of the exposure, but try not to go beyond thirty seconds or you will get noticeable star movement.

Time Lapse Skies. Video has a difficult time with stars, because to capture motion the video cameras expose 30 frames a second. Eventually the ISOs and software will allow it, but for now time lapse is the way to go. I won’t spend much time on the technique in this blog, but with high-end digital 35mm cameras, tracking devices and post processing, a compelling moving video can be made. Dustin Ferrell has been a pioneer in this technology and he has shared his expertise in a web tutorial. The second part of the tutorial is a technical treatise on post processing the images, but the first part displays his results and they are spellbinding and worth watching.

Andromeda

Jacob Ber’s Andromeda

Piggybacking on a Telescope. You can make a photograph by shooting through a telescope, but perhaps you are an astronomer creating an image rather than a photographer with a camera.
More sophisticated telescopes use motors and computers to track celestial objects. If you already have a telescope on an equatorial mounting and you know how to correctly polar align the mount, you can let the camera and lens ride piggyback on top of the telescope and shoot longer-exposure wide-field photos.
An equatorial mounting has one axis-aligned parallel to the axis of rotation of the Earth and is called the polar axis. The other axis is called the declination axis. This axis allows movement of the scope at right angles to the polar axis. Movements in these two axes together permit aiming the scope at any part of the sky. Once an object is found, both axes are locked down, and just the polar axis turns to track the object. Got it? If you are REALLY interested go here.
As primarily a still photographer, perhaps you can find an astronomer and ask him politely to piggyback your camera on his telescope.

Using a Remote Telescope. Many telescopes around the world allow you to buy “telescope time”. You can determine what part of the universe that you want to be photographed and what object. But how can you contact them?  Here is a link to the website Telescope Guide where you can learn how to contact observatories to capture your desired image. The website will guide your request so that you receive the best results. As a rule of thumb, most basic image requests using remote telescope operators will use 5 – 40 minutes of telescope time to capture your image. The observatory will give you a range of your costs when you specify the subject matter, but rarely will the charge exceed 30 USD..

Photos of outer space are fascinating! NASA has a website that features an “Image of the Day” gallery. On July 30, a high school student, Jacob Bers, took the Image of the Day -Andromeda, a “nearby” galaxy. It has hundreds of billions of stars. OK. Enough of having our minds boggled.

Experiment. A few nights ago, there was a moonless, still, clear night behind my house. I face 500+ acres of open space with no lights, so I set up to shoot the stars over an island. To my chagrin, when I went out in the middle of the night to photograph, clouds had moved in. Since I was already set to shoot, I went ahead. To my surprise, the island and clouds were illuminated by a distant marina (by the long exposure), but you can still see the stars!

Stars and Clouds over the Island

Stars and clouds over the island

I hope this blog will help you when you see the starry night and say, “I wonder how I can photograph this?’

Want to tap the expertise of a National Geographic photographer? Consider joining me on my upcoming workshop in the Serengeti. The cost has been reduced for last minute sign ups.

Sunrise , Sunset – How to Photograph the Sun

The previous blog concerned photographing the moon, and following this extra-terrestrial theme, here is a blog about photographing the sun. I used to say that perhaps 15% of all photographs were of sunsets, but with the advent of smart phones and selfies, this percentage has declined dramatically.

Unlike moon photography, determining the location of the sunrises and sunsets is relatively easy, as the location is visible for some time prior to the actual event. Here are some tips for creating excellent sun images:

Sun Halo

Sun Halo in Florida

1. NEVER look directly into the sun, especially through a telephoto lens. This is a great way to permanently damage your retinas. When aiming the camera, frame what you want above or below where the sun is, and then move the camera up or down to include the sun. If you do look through the lens, look anywhere in the frame but at the sun. Reflections of the sun off of the water also count.

Some cameras have a depth-of-field preview button next to the lens. You can configure the lens for the smallest aperture and use this button to look through the camera at the sun with minimum exposure, but it’s still dangerous.

2. As the sun sinks (or rises) into the atmosphere, a phenomenon similar to moonrises and moonsets occurs. When it is on the horizon, the color of the sun varies. This is because you are looking at the sun through much more atmosphere than when it is overhead. Dust in the air or photographing the sunset just after a rain can affect the color dramatically.

Christmas Clouds

Christmas Clouds

3. Clouds can help. The color of the clouds just after sunset or before sunrise can mitigate the intensity of the direct sun and add dimension to your image. No clouds create a situation where there is little drama in your sunset picture.

4. “Mask” the sun. Use atmospheric conditions such as fog, smog or haze to create “filters” where the sun is much more distinguishable and appears with definition rather than as a white orb. Other objects in your frame will have more character with a masked sun.

5. At sunrise or sunset, objects on earth will be silhouetted, as you are looking directly into your only light source and it is bright. Take your exposure reading off of the brightest parts of your framed picture, otherwise the resultant photograph will looked “washed out”. For sunsets with a fantastic array of multicolored clouds, position the horizon in the bottom third of the frame for maximum effect. You can use reflectors to bounce back some of the light, or use flash to “fill in” the light on subjects close to the camera (like people). Off-camera flash is desirable. With many cameras you can adjust the intensity of the flash so that your subjects are not extremely overexposed against a coal-black background.

Geese in Fog

Geese in Fog

6. We have seen many sunsets where the actual location is a mystery. The sun in Nova Scotia is the same as the sun in Costa Rica. Make yours different by including identifying objects such as lobster boats or palm trees.

7. Turn around. Sometimes the way the light at dawn or dusk strikes the landscape is much more interesting than just shooting another sunset.

8. Long shadows during the “golden hour” prior to sunset “model” the subject, creating a more three-dimensional effect for your actual two-dimensional image. Take advantage. You can still shoot the actual sunset.


White Mt Sunset

White Mountains Sunset

Additional tip: You can adjust the exposure on your iPhone by tapping the area where you want the best exposure, – i.e. the sun, or the foreground. You can instantly see how the resultant image will be affected.

Want to have a hands-on photographic experience? Join me on one of my international photography tours. Go here, or back to the menu bar and select “Workshops”.


Better Pictures When Shooting the Moon

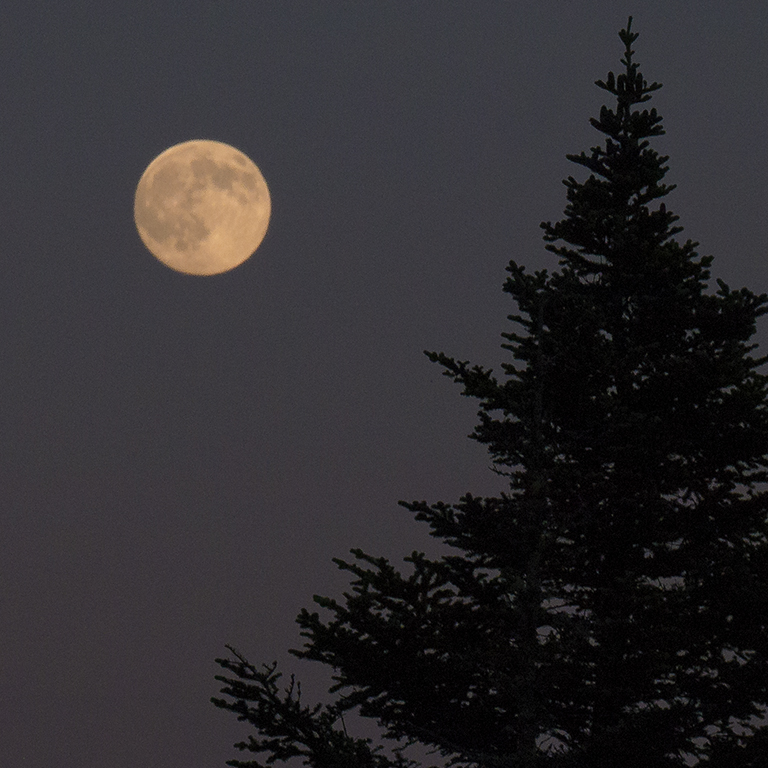
About once a month in the evening, barring clouds, a full moon appears in the Eastern sky. The sighting inspires poets, astronomers, lovers and photographers.

This blog is appropriate, as on July 12 we experienced a “Super Moon”, where the elliptical orbit of the moon brings it closest to earth and, according to NASA, a full moon at perigee (closest point) is up to 14% larger and 30% brighter than one at its farthest point, or apogee. We will have an even bigger Super Moon to photograph on August 10, 2014.

Here are some tips for shooting the moon:

Waves and Moon

Seascape in Outer Banks NC

1. The full moon is bright. For your camera exposure, use a similar one to what you would use when you photograph something on earth in bright sunlight. The natural color of the moon is a light grey and reflects sunlight very well.

2. Make sure you take your exposure setting off the moon, not the surroundings. If you don’t, the moon will appear as a white “hole” in the sky. Do not use auto exposure here!

3. Photograph the moon the night before the actual full moon. I call this night the “photographer’s moon”. The reason for doing this is that the moon looks full, but rises right after sunset, At this time, there is enough ambient light on “earth objects”, and the moon will be about the same exposure as these objects. Now the moon is located in a position showing where you are taking the picture. Note the seascape and mountains in the illustrations here. Don’t worry about the moon not being a full moon – it will look full in your photographs.

Mauna Loa Moon

500mm Lens – Hawaii

4. Long super telephoto lenses increase the relative size of the moon compared to the landscape and can add to dramatic effect. Make sure you have a small enough aperture (f stop) to have both the stuff on earth and the moon in focus. Obviously, the moon will be focused at “infinity”. You will need a sturdy tripod when using these lenses.

5. Make sure your shutter speed is at least a thirtieth of a second, preferably faster. The moon moves more quickly than you think, and with slower shutter speeds you will experience blurring moons in your pictures.

6. When it is on the horizon, the color of the moon varies. We refer to “harvest moons” or “red moons”, etc. This is because you are looking at the moon through much more atmosphere than when the moon is overhead. Dust in the air or just after a rain can affect the color of the moon dramatically.

iPhone Screen

Smart Phone App

7. So where will the moon rise? You can use apps or websites on your smart phone to figure this out. I use the app The Photographer’s Ephemeris, where I can designate my location and seen not only the latitude, longitude and elevation where I am at, but immediately see times of sunrise, sunset, moonrise, moonset and the compass directions of each.

Then I use the compass in my smart phone to visually locate where on the horizon the moon will rise on that particular evening. I look through the camera and move back and forth, right and left, so that the spot on the horizon where moonrise will happen is composed within my “earth” frame. I’m ready! Also note that the moonrise on each successive night is quite a few compass points away from the previous one.

8. What if your foreground subject is facing to the west? Look at your moonset direction and get up early in the morning and photograph the moonset at dawn.

Want to have a hands-on photographic experience? Join me on one of my international photography tours. Go here, or back to the menu bar and select “Workshops”.

Smith Island Moonscape

Smith Island Maryland


4k Video – Many, Many “Decisive Moments”

One overarching benefit of digital technology is the ability to recreate work with complete fidelity – in other words new works are exactly the same as the original. This benefit, coupled with the merging and warping of imagery is changing still photography. Several important developments are already here, and other are innovations are not far behind.

1. Stills from video. Panasonic has just announced their LUMIX FZ1000 camera, available late this month. It’s a long zoom camera (28-400mm equivalent) with 4K video capabilities for $900. According to Thomas Curley, Business Development Manager for LUMIX Professional Services, Panasonic North America, “The most amazing thing about it is that you can shoot a video clip (in 4K) then ‘in camera’ select a frame for the video and save it as a 8 megapixel Jpg that is suitable for printing. Nothing like this has existed until now and it is going to change how we take pictures.”

Tom is on to something here. I think that this is the first of many video/still cameras to come. With the LZ1000 you can preview the video frames on the LCD panel and then select the frame(s) that you want to convert to 8 megapixel still(s). Check out this video of what the camera can do. WIFI is also available on this camera to transmit your photographs immediately onto the web via a smart phone or an iPad.

Think three years out. The LZ1000 has a 20.1 megapixel sensor. Will they or other camera manufacturers find a way to wrangle out a 15 megapixel still or even higher res image? Bet on it.

2. HDR video. High Dynamic Range is a fancy term for combining several frames of a subject that have huge differences in exposure. The result is an image that pushes the dynamic range (specular highlights to deep shadows) of the subject toward the middle so that nothing is blown out or unreadable in the shadow area. Many still cameras now have this feature where a “burst” of frames are taken at a variety of exposures. In camera, or in post processing the images are merged together.

In video, this is difficult, as the dang thing keeps taking moving frames at 30 fps (frames per second). Now Red cameras and Magic Lantern software have come up with ways to double the frames at 60 fps with different exposures and then merge them in post production.

3. Auto focus for video. Rule of thumb: do not turn on auto focus on a DSLR when shooting video or the viewer may have an extended bout of sea sickness as the camera is constantly refocusing. Videographers have always been able to mask slight out of focus frames with motion and sound. But what happens when you pull an 8 megapixel still from the video? The resultant still can’t handle sharpness issues.

Now Andra and several other software manufacturers offer follow-focus for DSLR video. They run the application through an iPad and are able to make “focus pulls” on the fly with accuracy.

4. Helicopters and drones. Small, unmanned helicopters have been a staple for feature films and TV productions for 10 years. They are expensive, but can be programmed with GPS to fly the exact same flight again and again.

CopterStudios, a California-based company, uses a “pilot” for the remote controlled helicopter; a camera operator, who uses an IR remote control to adjust camera functions; and a set coordinator, who works with the director or producer to plan the shots.

The director or producer can watch the video in real time on a monitor on the set. SD video is transmitted from the JVC camera via a live video microwave downlink to a directional patch antenna, which feeds the reference monitor on set.
See their stunning demo video.

OK, so helicopters are pricey, but enter the drones. Drones DJI announced that it is working on an update of its S1000 Octocopter, a pro-level drone capable of carrying pro cameras such as a Canon 5D Mark III. That model should be ready in a few months and is expected to cost thousands of dollars, but may be very appealing to professional photographers and videographers.

At the present time, drones are banned from many National Parks and the Federal Aviation Administration (FFA) forbids commercial use. Under congressional order, the FAA must open national airspace to commercial and civilian drones by the end of 2015. The agency is in the process of determining the regulations for a drone license.

ADDENDUM ADDED

Grand Prismatic

Grand Prismatic Geyser

Reuters reported that a tourist seeking to take pictures of Yellowstone National Park crashed a camera-equipped drone into its largest hot spring, on Saturday, August 2. It was not clear if the drone that crashed into Grand Prismatic Spring damaged the prized geothermal feature when it sank into its depths, and officials were still trying to decide whether to remove it.

“What we have to determine is whether the presence of this radio-controlled recreational aircraft poses a threat to that unique resource,” park spokesman Al Nash said of the Grand Prismatic, the third-largest hot spring in the world and a top attraction for the roughly 3 million visitors who flock to Yellowstone each year.

The park is puzzling over how to find the drone and extract it without damaging the hot spring, which is 370 feet in diameter, more than 121 feet deep and known for its brilliant colors caused by bacteria and minerals in the water.

OK, so what does this mean for the still photographer?

First, not many people will be shooting still photographs – not even the professionals. If a client wants stills, why wouldn’t you shoot video where you can pick out the frame where the eyes are not closed, the action is at it’s height and the exposure and focus are right on? In addition, why would a client want to hire both a still photographer and a videographer?

So it is not “goodbye still photography”, but it will be “goodbye still photographer”, as we move to a video-centric world. Art photographers may still want to use still cameras, much the same as many of them today want to still use film. I have to make a living, and what is described above is, in my estimation, what will transpire in the near future. Get ready.

Fireworks on the Fourth – A Photo “How To”

Tomorrow will be the annual “fireworks fest” as we celebrate the country’s anniversary.

Here are some quick tips on taking pictures of fireworks.

1. Put the camera on the “manual” setting so you can dictate a slow shutter speed (below an eighth of a second – better a least a half a second). This will keep the fireworks from getting “clipped”, where the burst is not allowed to finish and is truncated.

Fireworks on Bastille Day

Bastille Day

2. With the slow shutter speed, you probably will need a tripod. Sometimes you can rest the camera on something and get away with a slightly shorter exposure, such as the one here of Bastille Day (France’s big fireworks day). The area was jammed with people, but I was standing next to a tree which helped steady the camera. Make sure you have “image stabilization” on.

3. The fireworks are a lot brighter than you think. You will probably be shooting at f11 or higher at an ISO of 100. After the first big burst, check your LCD and see whether you need to adjust your f stop.

4. To be very steady, use a remote trigger, or if you don’t have one, set the camera timer on 2 seconds so you can get away from the shutter button and allow the camera to stop vibrating.

5. If there is a steady bright light in your frame (like a streetlight), try to keep it out. A very bright, constant light can ruin your picture.

6. Try to include silhouettes of people or lit buildings in your image for locators.

7. Experiment. Most all fireworks images look similar. This one, by David Harp, was shot off a tripod, but from a anchored boat. The resultant image looks like palm trees!

David Harp's Fireworks

From a Boat

Want to tap the expertise of a National Geographic photographer? Consider joining me on my upcoming workshop in Tanzania.